Greetings Greenthumbs! I'm Kathryn Hogan, and I'm here to tell you about my adventures in permaculture.

If you'd like to know more about me, check out my website! www.kathrynhogan.ca


Tuesday, May 29, 2012

That's not Kale!

Something amazing has happened, and it's not kale.

A couple of weeks ago I posted A short tour of my Intensive Garden Beds. This tour included the following picture, which I naively thought was the Russian Kale I had planted in the spring.

I thought this was Kale! But it's not!
Those of you familiar with Kale and other cool weather greens may have laughed yourselves silly at my simple mistake. I thought that, having planted a particular seed, that seed would grow. What a fool I was!

As it turns out, these beauties have grown even more, become bushy and leafy and I finally had to taste one.

And huzzah! It's SPINACH!

Last year, I let a few of my spinach plants go to seed. Then I just left them, and buried them in mulch over the winter. That's all it took for a whole bed of spinach to bless my garden this spring. Were I the baby-spinach type, I would have been able to enjoy spinach salads even before dandelion salads.

I'm never pulling spinach from the garden again!

Feverfew Smells Amazing!

Just installed some heaven-scented Feverfew near my Saskatoon bushes. They should flower at about the same time, attracting bees to that part of that garden. I also installed chives near the honeyberries, for the same reason. I can't believe how good the leaves smell! I have been just running my hands over the foliage and sniffing in delight.

I still have EVEN MORE seed potatoes to plant, despite the feeling that for my whole life, I have done nothing but plant potatoes. Still, having enough potatoes to last into winter after gorging on the fresh ones in the fall will be well worth it.

In other news, it looks like the Oyster mushrooms will have their first fruit of the summer in the next two weeks or so. I'm so excited to eat them!

It's been a great day in the garden. Can't wait for tomorrow!

Friday, May 25, 2012

Problem Solving in the Garden

It seems that gardening knowledge focuses on solutions to problems. Permaculture takes that further, looking to solve problems before they happen, and enhance plantings so that they are as healthy as extremely healthy clams.

So far this spring, I've been doing LOTS of problem solving. Here are some problems I'm working on now, and how I plan to go about solving them. Check back for updates about how this works out.

1. Yellowing Needles on Siberian Pine


It took me a long time to find this sapling. Pinus Siberica, otherwise known as Siberian Pine or Siberian Cedar, is the tree for which the immensely popular book series The Ringing Cedars of Russia was named. They are slow growers well suited for my climate, and I am very excited to grow one.

To prepare the bed for this tree, I dug about 2 feet below surface and filled it with composted manure. Then I added an extra 1-1.5 feet of soil on top of that, and planted the little sapling directly above the hole. I did that because this species has a tap-root, and the soil where I live can be quite packed with clay deeper than a foot. This way, the sapling will already have a healthy root system before he has to get through the clay.

I also planted the sapling with a healthy dose of mycorrhizal fungi, which it needs to grow. As you can see, though, the tips of the needles are looking sort of yellow. 


What's wrong: 

This pine is in the sun almost all day, which he supposedly needs, so the problem isn't sunlight. It could be that the soil composition isn't what he's used to: I will do more research to find out. Finally, it could be that this guy just hasn't been getting enough water lately, because it's been quite dry here.

Solution:

Water the sapling lots and see if it improves. If not, research soil needs and amend accordingly.

2. Spindly Honeyberries


Compare the leaves on these two honeyberries:


What's wrong:


 The spindly honeyberries haven't been getting enough water: the healthy bushes are all in low, wet parts of the yard.

Solution: 

I cut some planting pots in half and placed them at the base of the berries, like so.

The top half of the container is about an inch into the soil. It makes a lip around the bush without disturbing the seedlings nearby.


This will help water collect where it's needed: their root balls. I will be watering them heftily in the weeks to come.

3. Yellow Meadow Rue


This Meadow Rue is tall, strong, has beautiful flowers, and is suddenly turning yellow.

What's wrong: 

There are a few options.

a) The Meadow Rue could be negatively affected by the spruce, among whose roots the Meadow Rue is planted. However, I've seen plenty of healthy Meadow Rue among spruce in the forest nearby, so that's probably not it (or at least not exclusively it)

b) A bit of frost damage

Wild Meadow Rue has just started growing.
c) Water being sucked up by spruce roots and not getting to the Meadow Rue

d) I got this Meadow Rue from a greenhouse, where it probably started growing 2-3 months ago. Meanwhile, the Meadow Rue growing wild nearby is only just starting to grow. It could simply be that this fella is ahead of season, and suffering as a result.


Solution: 

Wait and watch. Make sure this guy gets fair amount of water.

Tuesday, May 15, 2012

A few pretty things from the Garden


Blueberry Blossoms
Columbine flower


Me and the newest member of our family!
Romeo the Handsome Cherry Tree


A short tour of my Intensive Garden Beds

Russian Kale sprouts exploding into the world!
I mention my intensive beds a fair amount, and it's high time that you, the internet, get a photo-fueled tour of those beautiful places.

At the moment, the intensive beds are used for cold season vegetables like kale, radishes, and chives;  ground veggies including carrots, onions, and beets; herbs that will hopefully grow in my harsh climate including lavender, chamomile, parsley, oregano, more chives, etc.

Raspberry starting to come back, with herb
sprouts all around!


There are also some strawberries, four raspberries, a gooseberry, two goji berries, a blueberry and a siberian pine; all  planted how I want them to be when they are fully mature. As they grow, they will shade out the high production beds, who will move to a more dog-proof part of the world, namely, the front yard.


Gooseberry in the forefront, with beds surrounding it.


My lavender survived the winter!


The same gooseberry is now in the background.
Behind that is my log cabin!
In the meantime, however, all of the aforementioned bushes live in the middle of a sun-bowl with the veggies. That means they benefit from reduced winds and slightly higher temperatures, which will help them grow up nice and strong. Until that time, they won't shade my annual crops.

As the garden matures, these beds will become shadier places with lots of bushes and a couple trees (Romeo Cherry, Siberian Pine, the Trembling Aspen that already call this spot home, and the spruces that you can see in the background of the third picture.

I've already planned out how I'll change pathways as the garden grows... now I just have to wait to enjoy all of the delicious bounty!


The Shade Garden Is Planted!

The beautiful shade garden, with the hostas in front.
My shade garden is all planted! I can't wait for yummy fiddleheads, currants, nannyberries... mmmm.

There are three 'producers' in this two-tiered garden. The ferns will produce yummy fiddleheads in spring while the currant and nannyberry produce berries in the fall.

Everybody else is there either as ground covers (the periwinkle vine and hostas), as insect attractors (meadow rue, periwinkle, jack frost, bleeding heart all have blossoms at different times), as mulch providers (the hostas, because of their big leaves)... and of course, all of these plants are truly beautiful!

Close up meadow rue blossom: what a beauty.

Three No-Dig or Low-Dig Methods to Set Up a Garden Bed

In an attempt to try new and exciting things (and share the experiential knowledge with YOU, internet person), I used three different no dig or low dig methods of creating garden beds this year.

1. Raised Beds

The Blueberry Bed
I used retaining walls to build raised beds, right on top of existing grass. In most cases, doing this requires a barrier placed over the existing grass. A few layers of newspaper works great for this purpose. I decided against it, because I want my garden to undergo a relatively natural succession. Any grass that works its way up through 1.5 feet of soil is welcome with my saskatoon bushes :)

A great way to build hearty, fertile soil fast is to make raised beds on top of existing vegetation, using the 'lasagna' compost method. The lasagna method involves putting layers of compostable material down beneath the soil in which you plan to plant.

I did that for my berry spiral, including layers of partially decomposed grass, compost, and even some partially composted manure from a local field sometimes used by cows.

Which was surprisingly less gross than I expected.

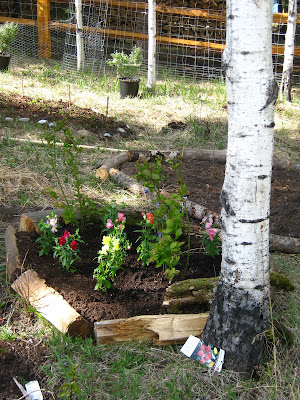
I also used this method for a small, very beautiful blueberry-and-snapping-dragon bed, using old wood as the retaining wall, and then placing some moss-covered, mostly decomposed logs on top of that for artistic effect.

Why This Works: 

While some of the tougher grasses may make their way to the surface of my new, raised beds, most of them will not. Instead, they will compost in place, drawing the rich soil life beneath them up and into my new garden bed.

While digging will disturb the soil ecosystem, possible leading to plant diseases and reduced nutrients, this actually adds nutrients to the soil, and encourages the many creepy-crawlies and critters to expand their territory upwards.

This is one example of working with nature, instead of against her!

The downside of this method is that you have to bring in a bunch of soil.


2. Loosen it up and Plant right in
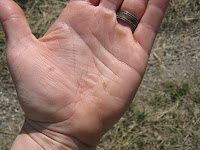


My blister.
After pulling out any big clumps of grass, I used a pitchfork to loosen the soil in one of my beds. Despite the fact that this didn't include digging, it was really hard! I got a blister.

Once things were loosened up, I added about 2 inches of composted manure on top. Then I planted directly into this. I put some raspberries, strawberries, and then scattered wildflower seeds to fill in the gaps as they grow.

Rocks: the easiest garden decor ever.
Why This (will likely) Work: 

Loosening the soil adds oxygen to parts that often don't get much. This will result in an explosion of soil life, and a dump of nutrients into the soil. My new plants will happily use much of that dump to get established. The reason I didn't dig up all of the plants present in the soil is so that they will be able to use any of the nutrients that my plants can't, meaning that less nutrients will be lost in runoff. I'm also hoping that the addition of manure will assist in a nutrient equilibrium.

Loosening the soil will ultimately make it much easier for my plants to get a foothold in what was a very root-saturated piece of land. When I loosened the soil with my pitchfork, I was causing a disturbance. As a rule, whichever plants get their roots out first after a disturbance have the competitive advantage. I'm hoping that will be the plants I planted, as well as some of the grasses and native herbs that I left behind.


3. Some Digging Required

All three beds in a pretty row. The 'Some Digging Required'
bed is the middle one, strategically hidden behind
a tree.
I'm not sure if this is an actual thing or not, but I had the inspiration to try it anyways, and will certainly keep you posted on how it works out.

I dug up the turf of my proposed garden bed, pulling the swaths of topsoil held by grassroots up and away. These averaged 6 inches in depth. Once I had a 6 inch deep hole, I turned all the topsoil-patties upside down, and put them back in that way.

That left the rich, worm-filled topsoil exposed to the air... and the roots of my waiting plants! I covered the whole, lumpy thing with some composted manure, and planted raspberries, strawberries, sunflowers and wild flowers in it.

Why This (may) Work: 

The main benefit of this exercise was bringing the really rich, black soil held firmly by the roots of grasses to the surface, where my new baby plants could access it; or simply away from the grass roots, where the raspberry bushes I put in could get a foot-hold. It was also not as hard as tilling, and required much less time, too. I didn't have to cart in any soil.

Like the loosening method, a big oxygen dump in that rich dark soil will cause an explosion of nutrients and soil life. I hypothesize that this will be tempered by a) the plants I planted, who will use many of the nutrients before they can be washed away, b) the manure I used as mulch, and c) the grasses that remain in the soil, albeit upside down.

Some of those grasses may find their way to the surface, and if they do, more power to them. As with the raised bed method, however, most of them will die and decompose where they are. As they decompose, they will replenish nutrients and thicken the soil with a layer of rich organic matter.

Huzzah!

Romeo, Romeo...

His name is Romeo.

He is handsome, tall, and charming. His scent is incomparable: sweet, soft, somewhat musky.

The best part?

He's very attractive. To beneficial insects!

(slap your thigh now)

Romeo is a Romeo Cherry that I found at a Canadian Tire tree lot yesterday while picking up a bunch of manure to use as soil amendment for some bushes that I'm putting in today. He is already a good 7 feet tall, has just begun to bloom for the year, and is just simply gorgeous.

Even better, he is hardy to usda zone 2 (I'm between 2 and 3), and produces dark, sweet, juicy cherries. While a smaller, less hardy, (and probably less delicious) Nanking Cherry was a full hundred dollars, Romeo was on sale for 45$.
An imposing angle for an imposing guy.

I couldn't resist!

Using a small natural rise on my land, I built a circular raised bed about 1.5 meters, or 5 feet, across. If you're interested in making your own raised beds, they're easy! Check out my 'how-to', which includes some alternatives if you don't have a lot of extra soil to use.

I planted the rest of Romeo's bed with strawberries, gladiola bulbs, and raspberry stalks (that will grow GOD WILLING. I got them for 1.50$ each: a complete steal. Let's just hope that I don't get what I paid for!) I also planted three walking onions, which are sun- or shade-tolerant, perennial onions that will continue to grow and produce as my presently-grass-land-like garden matures into a forest with deeper shade.

When that happens, the strawberries will die out, and the onions will take over!

In the meantime, Romeo is the place to be if you are an insect of any kind. What was a berefect piece of land only days ago is now buzzing - literally.

More Potatoes

Today I planted a giant, bath-tub sized tupperware container, a half-bath-tub sized tupperware container, and four 5 gallon pots that used to be home to several bushes, with potatoes.

That's a lot of potatoes!

I'm very excited!

Wednesday, May 9, 2012

Extinctions are Important - A Short Rant

Imagine that you live in a small town, where everybody has a job that helps the town function. There are farmers, ranchers, hunters, gatherers, doctors, lawyers, dentists, grocery-store-people, etc.

Now imagine that someone comes in and kills every single doctor, dentist, nurse, homeopath, naturopath, midwife, doula, or person with good knowledge of herbs.

How do you think that would affect your town as a whole?

Now imagine that someone comes in and kills off every retail person, and burns down all the stores.

Your town is not looking so good for the survivors.

Similarly, extinctions are just as damaging to ecosystems as climate change.